Rumored Buzz on Waterproofing Auckland
Our Waterproofing Auckland PDFs
Table of ContentsGetting My Waterproofing Auckland To WorkThe 2-Minute Rule for Waterproofing AucklandThe Best Guide To Waterproofing AucklandThe Only Guide for Waterproofing AucklandHow Waterproofing Auckland can Save You Time, Stress, and Money.
45m (18) in size, are laid in steady inclines. The joints of these pipes are maintained open. The accumulating chambers are built at suitable periods as well as at turning factors. The collecting chambers are not smudged from the inside or outside, to obtain water from the surroundings. The perforated pipelines are then covered with loosened products like chips and steel, to develop a filter media.The below ground water finds the means of least resistance via the filter media. The water is gathered in the perforated pipelines with the filter media. As a result of the slopes provided, this water is additional collected in the chambers in between. All the water therefore carried away. is lastly accumulated in the deepest chamber or sump.
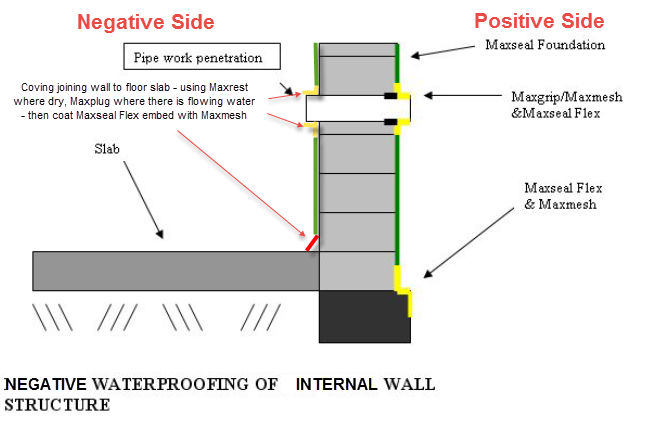
The treatment for the underground water storage tank is the very same as that of the cellar, except for the complying with factors. Check this pipeline for its tightness before the waterproofing job treatment.
4 Simple Techniques For Waterproofing Auckland
If white or colored joints are required, after that the grey concrete joints are raked, as well as white cement or shade cement slurry is applied with a tiny traverse the surface for joints of a matching shade. The surface area is once again cleaned with sawdust. to remove excess white or shade cement staying with the glazed china mosaic surface.
The base and also accelerator are blended with each other in percentage by weight. This mixed substance is then used with a spatula or portable gun tools anywhere called for. Additional product is cut off with a putty blade and a smooth upright joint is developed. Considering that the sealant is extremely expensive, utilize it.
For water-proofing of the straight development joint, arrangements ought to begin from the R.C.C. phase of the structure. Upside down beams are taken to the location, for the growth joint, side by side.
Socketing (stress grouting)' is a treatment to grout the concrete slurry by stress into the porous concrete member. For stopping unnoticed leaks in commodes, balconies, and also the cellar, this method is generally utilized. Complying with a sequence of the job treatment. is observed. Initially, tidy the surface area where socketing is to be done.
Some Known Facts About Waterproofing Auckland.
Place 20mm (3/4) steel over the chiseled portion, as a filter media. Fix 25mm (1) G.I. outlet over the metal, using abundant cement mortar around the socket and steel. Enable 24 hr for the mortar to settle and also the tight fixing of the outlet. Wage grouting making use of a diameter G.I.
5 to 2. 0m. Grouting should be done with concrete slurry of the required thickness. For smooth flow, include 1 bag of cement to 75 to 100 liters. If the waterproofing job procedure is refrained appropriately, it can pose troubles. Repair work and upkeep of waterproofing can prove really problematic for the customer.
The joint between the (tee) of outer vertical stack as well as P.V.C./ C.I. item. The joint in between the flushing pipeline and I.W.C pan. All these joints must be secured with the correct sealer, at the respective phases throughout the implementation of the job.
Additionally, fill all the gaps in the flooring of W.C. with cement. Examine the joint in between the P-trap and also L.W.C. frying pan from above, by putting a hand right into the catch. Seal this joint with M-seal, if it is partly open. Examine the joint in between the flushing pipeline and also L.W.C. frying pan by damaging just one ceramic tile, fitted precisely over the junction.
The Best Strategy To Use For Waterproofing Auckland
Open up the "Tee' of the vertical pile from the outside, with a ladder or zula and observe the joint of C.I. item as well as Tee' with torchlight and also seal it appropriately. If leakage still persists, burst the concealed flushing G.I. pipeline as well as check if it is water tight. Replace the dripping pipe/G. I.
If this does not quit the leak, break open the total device and examine the joint at the P-trap and C.I./ P.V.C. pipe. Do the brand-new waterproofing work treatment entirely with utmost care. Usually, 90% of leakages quit, if we accomplish the repair service job as stated above, in the initial four points.
This can be inspected by quiting the procedure of the wash hand basin as well as keeping these lines entirely dry and also operating them again after 4-5 days. If the leakages dry out as well as begin, the resource is via these lines.
Break open the bathroom waterproofing job treatment and also re-do it very carefully. A typical as well as successful method for treating minor leaks is to deal with the afflicted part with cement slurry.
Getting My Waterproofing Auckland To Work
Examine the affected look at here now section of the terrace making use of a wooden club as well as examine if it has peeled off. If the leak is from the corners or from the parapet wall surface, then fill up all the splits after breaking it open with concrete.
Some chemicals are recommended for blending with concrete, at the time of concreting. The standard method of brickbat coba is still the most preferred of water-proofing method in India. Waterproofing substances are generally offered in powder and also liquid type, as they offer the dual purpose of waterproofing work treatment and warm shielding.
Make sure that the socketing is done prior to the base layer job. Ensure that all the brickbats are well-soaked in water, before use.
Keep a correct gap between the brickbats. Check the slope of sites the brickbat coat, in the direction of the catch. Ensure that the water-proofing compound is mixed in the mortar, for every stage of work. The topcoat ought to be brought out in one stroke, without any kind of joints. Ensure browse around this site proper finishing near traps as well as spouts.